Interaction Design and Prototyping for XR

A project-based online course exploring the best practices to design and prototype intuitive, functional, and user-centered experiences for AR, VR, and MR.

Final Project

Project Duration: 2 Weeks

Background: In VR workshops, users often need help acclimating to VR controls, resulting in significant time spent on orientation rather than on the workshop content. Currently, ‘First Steps, ‘ an app provided by Quest, is used for initial orientation.

Problem: The current onboarding process poses a significant challenge, reducing the effective time available for workshop activities, especially when sessions are limited to 40 minutes.

Affected Users: Workshop participants (novice technology users, students, faculty, and industry professionals).

Impact: Reduced workshop efficiency and user engagement. Missed opportunities for deeper exploration of VR, AR, and MR technologies.

Objective: To create an XR Exploration Hub that provides an engaging and comprehensive introduction to VR controls and XR technologies, allowing more time for hands-on experience and data collection on user feedback and potential respective industry applications.

Project Introduction and Course Reflection:

From Weekly Assignments to Final Project

The XR Exploration Hub project aims to introduce novice technology users to the immersive world of virtual reality (VR), mixed reality (MR), and augmented reality (AR) through interconnected ‘mini-worlds.’ For this submission, a slice of the project is presented via three scenarios that encourage users to learn more about immersive technology. To view the original project idea, click here.

I had initially planned to create multiple virtual worlds for each XR experience, aiming to provide educational insights into emerging technologies suitable for industry applications. Upon gaining deeper knowledge of Unity via the weekly assignments, I realised the potential to streamline the project by transitioning scenes between VR and MR to maintain an immersive experience in a more condensed format.

Milestones:

  • Completion of final design documents, including storyboards and interaction designs using Meta building blocks (Meta Quest, 2023).
  • Setup and integration of scenes in Unity.
  • Development of the VR scene as a primary objective, with MR and AR scenes as additional ‘nice to have’ goals.


Feedback Incorporation

Through instructor feedback, I was encouraged to think holistically about the project. Creating a seamless and engaging transition between VR, MR, and AR. By adopting a unified nature theme and leveraging interactive storytelling through animal guides, this approach will hopefully educate and captivate users, allowing them to explore technological possibilities in a contextually rich environment.

"The world around you is an infinite canvas for amazing new apps and games with depth scale natural inputs and spatial audio. You can create experiences that were never possible before. You can enhance an existing app with key moments or create something entirely new."

Watching the Apple Worldwide Developers Conference presentation, Design for Spatial User Interfaces, was inspirational for the development of this project, and I was excited to explore how I can use audio and assets placed throughout each scene to enhance the project. I also created notes on the principles of spatial design from the talk that will help guide this project and reflect on the experiences I make. Click here to view Apple’s Principles of Spacial Design.

Prototyping and Learning

Some initial prototyping was conducted through weekly assignments, allowing preliminary testing of VR interactions. The feedback was considered for this final project (explained below within the Detailed Scene and Interaction Designs section). Click here to view the initial testing.

Technology and Tools

The decision to switch from the XR interaction kit to Quest building blocks was based on the short time I used it, finding it a logical solution for creating a Unity build that allowed easy scene setup. It enabled starting in a VR scene, transitioning to MR, and then returning to VR. This switch, although challenging, provided a new perspective on project setup and offered insights into alternative ways of achieving similar outcomes. It has been a learning journey, providing an opportunity to compare methodologies within Unity, and I plan to continue exploring these beyond this course.

Click on the Miroboard link below to explore my ideation. This board outlines the project’s development, building on insights and progress from the weekly assignments.

Updated Project Documentation: Revisiting and Refining

Integrating Insights and Feedback

The original documents for this project, created in Week 2, started with a broad and exploratory scope. Since their initial development, updates have been made to align with the project objectives and reflect insights gained from ongoing coursework and constructive feedback from instructors. The revisions tighten the project outcome and outline what would be tested through the prototype, such as user engagement and understanding of XR technologies and the practical application of these technologies in various scenarios.

Click the Miroboard to view the updated Seven Questions before Prototyping and Project Brief Documents.

Visual Overview: Main Storyboard

Outlining the Scenario Across Three Key Scenes

This storyboard provides a visual guide through the XR experience of transitioning between VR and MR, highlighting user interactions, environmental engagement, and puzzle-solving tasks.

The user is welcomed into a nature-themed VR environment, with an animal narrator and a user interface to guide and help them practice navigating within a virtual scene. The user is tasked with a puzzle-building challenge to build a bridge over the river. In addition, there will be hidden ‘Easter Eggs’ and interactive elements like wildlife encounters.

The user transitions into an MR environment where elements from the virtual world interact with the real world. Butterflies spawn into the space and react to gestures. Another puzzle is presented to users, and upon completion, they enter the next scene.

The user returns to a virtual room decorated with natural assets to learn about AR. They will interact with an animal narrator and can explore elements within the scene with a mobile phone connected to the controller to demonstrate the principles of AR. Lastly, finishing with a survey to encourage users to consider how these immersive technologies can be used within their industries.

Detailed Scene Breakdowns and Interaction Designs

Exploring Each Scene with Focused Storyboards and Sketches

VR Scene

The primary goal of the VR scene is to offer users an immersive exploration of a forest environment, introducing them to interactive and educational elements that enable them to become familiar with VR. Here, the user will be introduced to a narrator (who will accompany them throughout the experience), interact with a user interface and objects and complete a bridge puzzle to cross a river. At the end, the narrator appears and poses a question, encouraging users to think about their experience in VR before pressing a button and moving to the next scene.

Click on the Miroboard below to view the storyboards for this scene. A task flow has also been created to outline the interaction and feedback elements. If this project were to continue and be passed to a developer, I would do the same for the following two scenes. However, this helped me to consider appropriate feedback for each interaction in all three scenes.

MR Scene

The MR scene aims to transition users from virtual reality into mixed reality. In this scene, the user will again be greeted by the narrator and the butterflies from the last scene. The narrator will encourage the user to interact with the butterflies (in a final build they will disappear on interaction). Once the butterflies have gone, the narrator starts the second puzzle, which sees the user look for penguins (these later can be swapped out for something else if needed) spawned into the room upon entry. Each Penguin will give users information on mixed reality and pose questions to encourage them to think about their experience. Once the clues are completed, the narrator will instruct them to move to the next scene.

Click the Miroboard below to view the scene storyboards and project notes.

AR Scene [within VR]

For this part of the experience, users return to a virtual environment. Welcomed by the narrator, they are informed that this scene will explore AR. Users will see a mobile phone asset attached to their controller, which they will be instructed to hover over items to simulate AR on the phone. In this scenario, users will explore items related to looking after a dog. Since creating the interactions is beyond this project’s scope, I have drawn the interactions that would happen for each AR element.

Click the Miroboard below to view the scene storyboards and project notes.

Setting up Unity

Downloading and Installing Meta SDKs

I needed a refresher on ensuring the project in Unity was set up correctly to support working between VR and MR scenes, and Game 5D Offical’s Tutorial (2024) helped me do so. I deviated from the tutorial as I installed the Meta-All-in-One SDK (Unity and Meta Quest, n.d.); the author explored downloading only a few of the SDKs to reduce the bloating of the project. I chose the Meta-All-in-One SDK as I knew there were components that I would need, such as the interaction SDKs and samples. After a few setbacks (such as having two right-hand controls), I was finally ready with a unity project!

Building the VR Scene

Reflecting on Progress: Transitioning to Quest Building Blocks

During the weekly assignments for this course (weeks 2 -5), I managed to create a scene with two floating worlds, implement teleportation, and add assets to build a bridge (using the XR interaction kit). As I prepared to start a new project with the Meta all-in-one SDK, I wanted to refresh my memory and assess what needed rebuilding.

Initially, my plan was for users to build a bridge to access the next floating island. However, after testing, I found that moving large assets, like tree trunks, could be disorienting for new users. To streamline the experience, I used pre-imported assets from a creator (StreakByte, n.d.). Among these assets was a floating island with a river, which seemed perfect for the project. Once I imported the island, I realised that the scene needed to be bigger to accommodate the new layout and allow for exploration by the user.

The original scene with two floating worlds was built within the weekly assignments.

Imported floating island scene to use with Meta building blocks.

Connecting Scenes

Digestable’s tutorial on YouTube (2023) helped me to connect the three scenes with buttons. Testing the scenes within the Unity play editor, I successfully switched scenes.
Then, I needed to make the buttons interactable with the controls. I initially dragged the Ray interaction block onto the canvas to do this, but it didn’t work. After searching a few forums, I discovered you could right-click, select Interaction SDK, and add Ray Interaction to Canvas—this worked!

When I tested the button, I found that it only functions with the ray interactor from the controls when I am close to the panel. Using the right click option for the interaction SDK to add interactivity or adding a building block to canvas did not work.  Following Valem Tutorial on Youtube (2024b) demonstrated how to add all of the compontents manually. 

Additionally, when testing the Ray Interactor with other UI elements, I needed to extend the ray interactor beam. With my tutor’s help, I learned how to extend it (using Max Ray Length) within the Ray Interactor GameObjects of the controls.

Working within the Scene

I found myself getting lost in loops, trying to figure things out rather than focusing on prototyping. I spent a couple of days breaking things and then fixing them again. I drew my interactions instead to ensure I have a product that visualises my ideas in Unity (adding them as a Canvas Image). I used the free assets I had already imported.

The first task was to import the narrator. I chose the bear for the entire experience and placed him at the beginning of the scene. Initially, I had a parent game object with a bear prefab and a canvas with an image, set to load after about 10 seconds, accompanied by a bear sound to capture the user’s attention [ AI helped me with the script for this]. If this project was to be continued, the instructions would also be spoken, to provide a more inclusive experience. However, 10 seconds was too long upon testing, and animating the bear did not correctly load into position. I decided to have the bear already in the scene, waiting for the user to enter, which worked better as they would immediately notice and think, ‘There’s a bear!’ And change the load time to 4 seconds.  I also lowered the speech bubble as it was making me tilt my head back to read it, ensuring a more comfortable user experience.

Planning Tutorial Interactions

Tutorial Interactions

When designing the welcome tutorial, the focus was on creating an intuitive guide for users. Considering their different skill levels, it was essential to provide detailed instructions that would allow them to navigate through the scene autonomously (for this prototype, I have used a bear growling sound- this would not be used in the outcome; it would be replaced by a voice narrating to the user). This would then free up time for novice users needing additional assistance. Previous workshops have revealed that some users experience issues with headsets or struggle to get accustomed to the controls, especially when they are first-time users.

Adjustments to the VR Scene

While exploring the scene in the headsets, several adjustments were necessary. Some assets were floating above the island base and required repositioning. Additionally,  the size and position of the UI panel needed adjustments to ensure they were appropriately scaled and accessible.

Controlling User Navigation

A key aspect of the scene was controlling user navigation and ensuring they followed a predetermined path. Initially, using the teleport building block enabled teleportation over every mesh, allowing users to move anywhere in the scene (and potentially miss/cheat on the tasks). To address this, I turned off the mesh for the island floor, restricting users to teleport only along designated paths, effectively guiding them through the intended route. This was crucial for tasks like the bridge-building activity, where preventing users from teleporting over the river and bypassing the intended challenge was necessary. These changes structured the VR Scene to encourage learning and interaction.

Planning Bridge Task Interactions

My journey through previous course assignments explored the XR Interaction Toolkit, where I learned to add interaction sockets and interactable components. I also created a paper prototype to test whether colour-coded elements could aid users in completing the bridge-building task. The testing phase revealed that additional instructions were necessary, which led to the integration of a narrator and UI instructions throughout the VR scene to guide users effectively.

Prototyping Focus

Experimenting with the XR Kit and socket interactors taught me the importance of focusing on prototyping rather than trying to build the final version immediately. This shift in approach allowed me to refine interactions and user experience, ensuring that the final implementation could be effectively developed by a dedicated developer.

Adjustments in VR Testing

Initially, I experimented with moving bridge elements between two floating worlds in VR testing (as previously shown). This test highlighted that the pieces were too large for users to control, especially those still acclimating to navigation within the scene.

These findings enabled me to refine my approach to interacting with the build-building task, using ProBuilder to create bridge pieces to effectively prototype my idea.

The videos below show testing interactions with the XR toolkit and paper prototyping exercises from the weekly assignments.

ProBuilder Bridge Building

Following the construction of the bridge pieces and their interaction setup using meta SDK and testing within the scene, I realised the functionality was different to that of the XR Interaction Kit, which enables you to use your left control to move the individual pieces backwards and forwards as well as walking with them. Using the Meta Interaction SDK, the pieces can be picked up and placed but not moved further away with the control. Instead, the users will need to bring the individual planks and move them along as they move across the bridge. Additionally, the main beam’s (across the river) mesh was switched off, so users have no choice but to build the bridge whilst teleporting across

I have marked the colour-coded slots on the bridge to show where the planks should be placed, providing users with feedback that the bridge pieces are in the correct position. This is where the input would indicate that the bridge is assembled correctly.  Lastly, within this in the section, the users can click on the help sign if needed.

Overcoming Challenges and Building Confidence in Unity Prototyping ​

Navigating Unforeseen Challenges

Creating this VR scene introduced me to the unpredictable nature of bugs and glitches that can seemingly come out of nowhere. There were instances where interactions from the controls would disappear or not work at all. I found it helpful to follow tutorials that taught me how to set up things manually, reducing reliance on pre-built building blocks (although these are great when they work!). It was initially nerve-wracking learning new methods for completing a final project; this approach proved invaluable for understanding the underlying mechanics of VR development.

Importance of Backups and Maintenance

One crucial lesson I learned was the importance of creating frequent backups of my scene. This practice saved me from potential data loss and allowed for easy recovery from unexpected issues (when I broke things!). Additionally, I discovered that when my controls stopped working, it wasn’t necessarily an issue with my scene; often, a simple headset reset would resolve the problem (after I broke things!). Restarting Unity periodically also proved beneficial when things decided not to work.

Building the MR Scene

Enhancing Immersion in MR Scene with Penguins

The transition from VR to MR

After building the entire scene in VR, my experience significantly improved my efficiency. Understanding how building blocks work allowed me to construct the MR scene quickly and effectively.

Setting Up the Penguins

Initially, I planned to place buttons in front of the penguins that, when pressed, would reveal a clue. However, after observing the penguins in my physical space, picking them up would be far more immersive, enhancing presence and blurring the lines between the real and virtual worlds.

Once the penguins were functional, the next step was to add the additional elements:

Clues: Placed clues at the bottom of the penguin platforms.
Narrator and Butterflies: A bear narrator and butterflies were added to transition the user to the scene. The narrator provides instructions and clues to the user.

Using AI for Automation

I utilised AI to create a script that delayed the spawning of the penguins. This delay gives the user time to listen to the narrator and read the instructions and information about MR experiences. Additionally, a penguin sound plays when they spawn, notifying the user and prompting them to look for the first penguin, as the narrator indicates.

Testing and Adjustments

During testing, the following things will need to be adjusted:

  • Placing the narrator appropriately in the physical space, avoiding a floating appearance in the room space. I will explore setting additional anchors within the room space.
  • Upon picking up the last yellow penguin, the scene should trigger the butterflies’ return and play a celebration sound to prompt the user to press the button to the next scene. For the prototype, the user can press a button.

The videos below show that the penguins are randomly distributed to areas I have tagged within my room space using the’ Find Spawn Positions’.

Building the AR [in VR] Scene

AR in VR Simulation

The AR in VR scene uses the room model provided by Meta’s interaction samples.  To simulate AR within VR, I set up a game object to mimic a phone camera, using a Render Texture on a material. This then pointed to a plane, which was attached to the controller.  When testing the scene, the camera works when playing the scene in Unity but does not render it in the VR headset.  I tried changing graphic APIs, but that did not work either.  So here is where the project finishes… for now! 

See next section below for a video of the final outcome.

PRoject Outcome

Final Words....

The project has come a long way, incorporating playtesting and feedback to refine the VR and MR scenes. The Meta-All-in-One SDK has played a crucial role in bringing the project to life. It was also fun to experiment with AI to write scripts.  I would like to explore this further.
Looking ahead, I’m excited about the potential of using Meta SDK prefabs to elevate the interfaces and interactions even further.

Circuit Stream
admin

Week 8: Exploring Mixed Reality
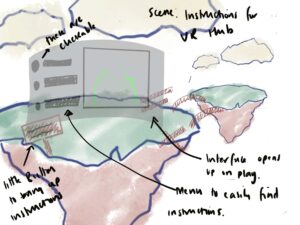
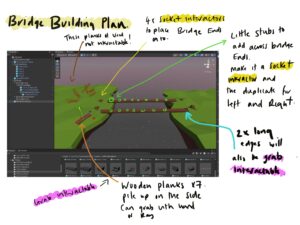
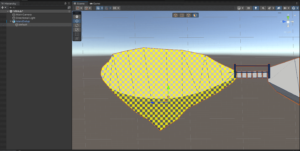
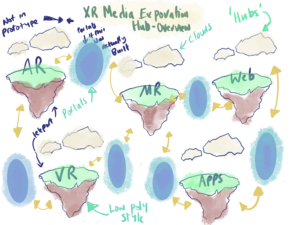
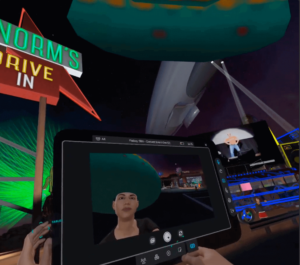
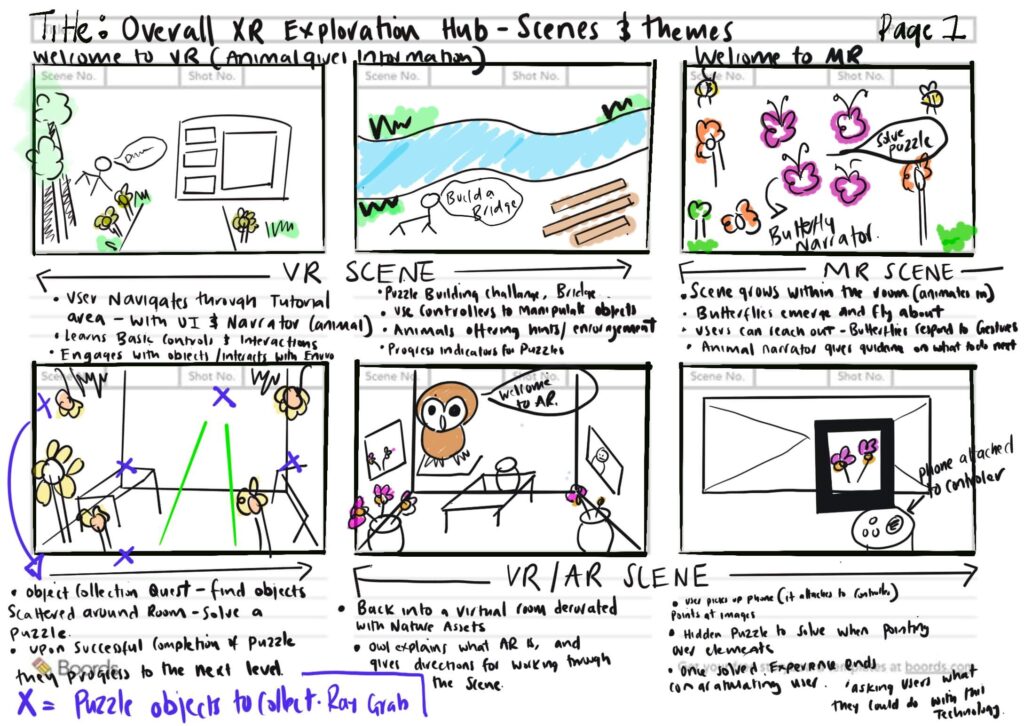
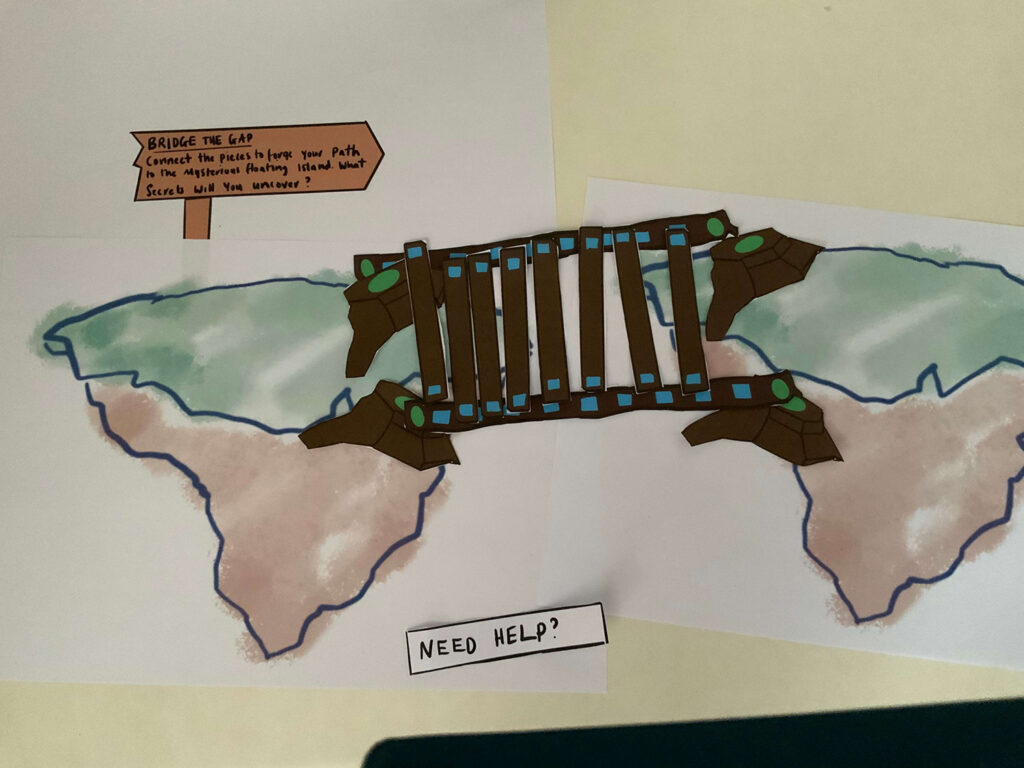
The primary objective of this assignment is to challenge you to propose and prototype a Mixed Reality (MR) application, leveraging the convergence of virtual and augmented elements. This task encourages you to think beyond traditional boundaries, utilizing any necessary tools to effectively communicate your MR concepts and showcase a seamless integration of digital and physical worlds

Augmented Reality Prototyping
Augmented Reality
admin

Week 7: AR Prototype

The primary objective of this assignment is for you to design and prototype an Augmented Reality (AR) application that aligns with your unique vision. By leveraging principles of immersive AR design, user interaction, and human-centered concepts, you will create an experience that seamlessly blends digital elements with the real world. Playtesting will offer essential user feedback, allowing you to iterate on your rapid AR prototype and deliver an engaging and user-friendly AR application.

Paper Prototype
Circuit Stream
admin

Week 6: VR Prototype

The primary objective of this assignment is to give you the opportunity to design and prototype a VR application that reflects your unique vision and incorporates the principles of human-centered design, interactivity, and immersive user experience. By playtesting your rapid prototype, you’ll gain valuable user feedback to refine and enhance the VR application further.

Detailed Scene Sketch
Circuit Stream
admin

Week 5: UI Prototyping

The primary objective of this assignment is to expand your XR application’s capabilities by integrating a user interface. Through this process, you will design and implement UI elements that enhance the user experience, offering essential information and interactive controls within the VR environment.

Bridge Plan
Circuit Stream
admin

Week 4: Unity’s XR Interaction Toolkit

Objective: Transition your existing 3D scene into a VR application using Unity’s XR Interaction Toolkit. By setting up the XR origin and implementing interactions through interactors and interactables, you will enable users to engage with and navigate through your XR environment, providing a taste of the interactive experiences your application aims to deliver.

Selecting Model Faces in Unity using the ProBuilder tool
Circuit Stream
admin

Week 3: Utilising Unity to Prototype XR Applications

Objective: Compose a 3D scene in Unity, using ProBuilder for prototyping and incorporating assets from external sources to enrich your XR environment. This practical exercise will bridge the gap between the design documentation and the virtual space, fostering a deep understanding of Unity’s capabilities for XR development.

Week 2 Blog Header. Sketch showing different VR Worlds
Circuit Stream
admin

Week 2: Designing for Extended Reality

Objective: Apply human-centered design principles by developing thorough documentation that outlines your vision for the application. This documentation will serve as a roadmap for the subsequent prototyping phase, ensuring that the XR experience is user-centric and technologically sound.

Adobe Aero Certificate