Exploring the composition of a 3D scene in Unity, leveraging ProBuilder for rapid prototyping and incorporating assets from external sources to enhance the XR environment. This process bridges the gap between design documentation and the virtual space, fostering a comprehensive understanding of Unity’s capabilities for XR development.
Week 3 of the XR Exploration Hub project continues the journey into virtual reality (VR), advancing from the planning phase into prototyping in Unity. This week’s assignment focuses on setting up Unity with the Universal Render Pipeline (URP), exploring ProBuilder for environment creation, and importing assets into the scene.
Recap of Assignment 2
Assignment 2 focused on applying human-centered design principles to develop comprehensive documentation outlining the vision for our XR Exploration Hub project. This documentation is a roadmap for the subsequent prototyping phase, ensuring the XR experience remains user-centric.
Unity for Protoyping
Creating a Unity Environment with URP, ProBuilder, and ProGrids
Setting up Project with URP
Unity with the Universal Render Pipeline (URP) was integrated to enhance the prototype’s visual fidelity and performance. This rendering solution optimises performance and visuals, ensuring the XR experience is visually captivating and technically efficient.
Exploring ProBuilder
ProBuilder was integrated into the Unity project to facilitate the creation of 3D models for the VR prototype. Additionally, ProGrids was installed, although our instructor noted that similar functionality is already available in Unity. I adjusted the grid settings to snap measurements to increments of 0.5, providing precision during modelling. I tested this by moving a GameObject cube in the properties panel.
Following a provided tutorial, I built a chair. Navigating Unity’s different perspectives was a challenge initially, but with practice, I gained proficiency. I encountered difficulty when attempting to edit extrusions after deselecting, as this often resulted in unintended changes to the model. As a takeaway, I recognised the importance of using ProBuilder primarily for creating rough prototypes to convey my vision effectively.
Takeaways from the tutorial:
Research Dimensions: Understanding the dimensions of an object, in this case, a chair, served as the foundation for modelling. By researching and noting the ideal height and seat width, clear parameters were set for the design, ensuring accuracy and realism in the virtual environment.
Create the Seat: The modelling process began by generating a cube primitive to craft the seat of a chair, adjusting its dimensions to match the predefined specifications.
Prepare for Extrusion: The next step was to prepare the geometry for extrusion. ProBuilder’s Edge Mode made this task straightforward, allowing me to select parallel edges on the seat’s back easily. I added extra geometry using the Insert Edge Loop function, ready for the upcoming extrusion.
Extrude the Back: Leveraging ProBuilder’s extrusion capabilities, I elevated the chair model by adding depth to its backrest. Selecting the appropriate face and employing the Extrude Faces tool, I extended the geometry, transforming a flat surface into a three-dimensional structure.
Extrude the Legs: I utilised Edge Mode to select edges for extrusion, inserting edge loops to define the desired leg segments. Using ProBuilder’s Face Mode, I extruded each leg downward, refining the model’s form and function.
Importing Assets
Unity Asset Store - POLYGON - Sampler Pack
Incorporating the POLYGON Sampler Pack [obtained free with Unity Student License] (assetstore.unity.com, n.d.) into my Unity project was a straightforward process that will enhance my prototyping workflow. With its diverse collection of low-poly style environments, characters, and props, this asset pack perfectly matched my aesthetic goals.
Its support for the Universal Render Pipeline (URP) was crucial, ensuring compatibility with Unity’s modern lighting and rendering techniques. What is also exciting about this pack is the potential to animate characters using Mismo, promising a new dimension of interactivity and immersion for future projects. I navigated to the Unity Asset Store, downloaded the pack, and used the import option within Unity’s Package Manager Asset menu to import the assets.
Exploring New Poly Shape Tool
Initially, the plan was to use the New Poly Shape tool in ProBuilder to add a plane to a mountain, rotating it 180 degrees to create a floating world. Despite discovering existing low-poly floating models, I saw this as an exercise in practising using ProBuilder.
Transitioning to the next phase, I encountered a challenge: creating a shape that mirrors the contours of an existing game object while keeping both objects distinguishable. I could not find a way for Unity and ProBuilder to support simultaneous editing modes for both an existing game object and a ProBuilder object so I could easily trace around the edges.
In conclusion, while exploring ProBuilder’s capabilities, I contemplated the possibility of inserting reference images or utilising external modelling software to streamline the process. However, it’s crucial to remember the overarching goal of facilitating rapid prototyping so that ideas can be easily iterated and tested.
Importing from Sketchfab
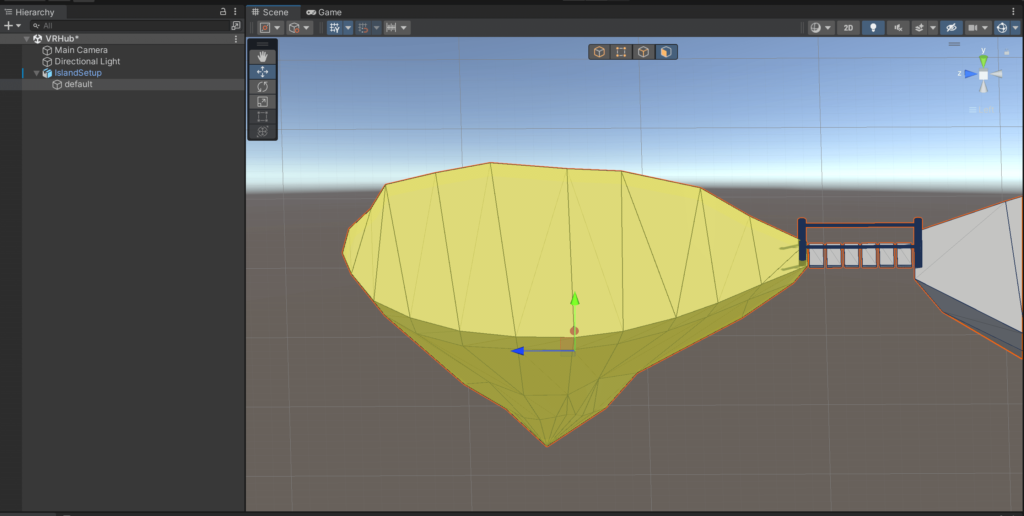
Next, I sourced a basic floating island model on Sketchfab to experiment with asset importation techniques in Unity. This straightforward model will serve as a foundational piece for combining/experimenting with the assets, materials, and textures from the Polygon Sampler Pack. The asset was imported directly into Unity through the Project menu panel within sub-folders created for the project.
Reimagining the Project Structure
Importing the basic floating island model fundamentally reshaped my project’s design. Planned initially as separate hubs for AR, VR, and MR experiences, the model’s unique design—linking islands with bridges—inspired a unified, central starting point. [For the VR Hub] Users will now begin on a central island, greeted with a tutorial on controls and a bridge-building task. This leads to the butterfly experience on the next island and culminates in a final task, accessible without the need for bridge construction. This streamlined approach suits my novice status, hopefully ensuring project completion, and retains modularity for future expansions, aligning with the concept of extensibility discussed in The Seven Questions Before Prototyping (Zubek, 2020).
Converting the Model to a ProBuilder Object
The first step in my process was to convert the imported model into a format that ProBuilder could work with. With the model selected in my scene, I navigated to Tools > ProBuilder > Actions > ProBuilderize. This action transformed the model into a ProBuilder object, unlocking a wide range of editing tools and features ProBuilder offers. This conversion allowed me to separate the model, as it was imported as one object.
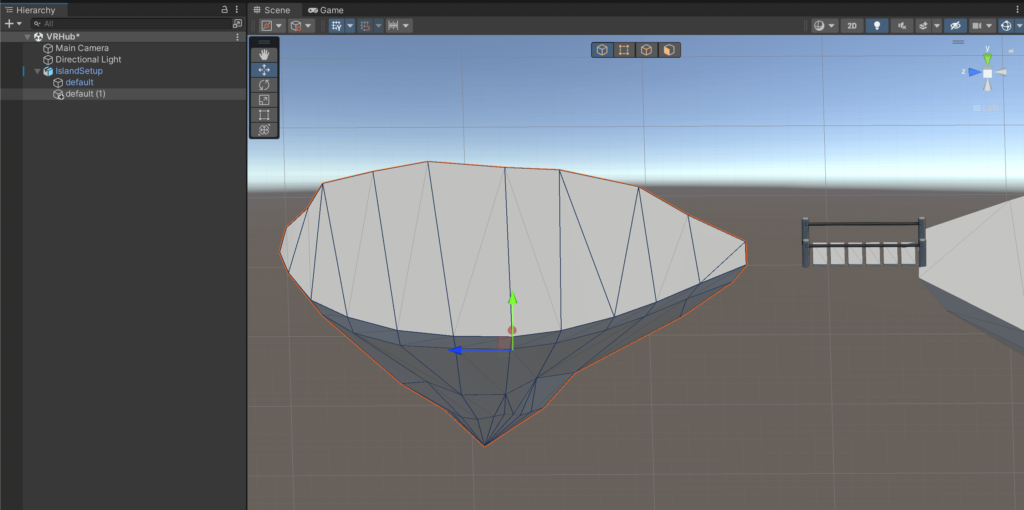
Detaching Faces to Create New Objects
With my model now in ProBuilder format, I needed to isolate the parts I wanted to turn into independent objects. I entered Face Selection Mode, enabling me to interact with the model’s faces directly. I selected the faces that comprised each “island” I wanted to separate. Holding down Shift allowed me to select multiple faces simultaneously. Once I had highlighted all the faces for a particular section from the ProBuilder context menu, I chose Detach > To New Object. This command detached the selected faces from the primary model and created a new, independent object.
I repeated it for each “island” and bridge I wanted to isolate, breaking the model into separate pieces. Even though I could import single, floating island models from other sources, this exercise allowed me to experiment with ProBuilder’s features and better understand its capabilities.
By converting these components into prefabs, I can easily reuse and manipulate them across my project. This exploration into ProBuilder’s functionality was a solution to an immediate challenge and a valuable learning experience that will influence my future work in Unity.
Next Steps
This week’s assignment delved deeper into Unity prototyping for XR applications, transitioning from design documentation to the virtual space. By incorporating ProBuilder and external assets, I bridged the gap between concept and creation. I plan to continue refining the scene by adding more assets from the sampler pack, experimenting with materials and prefabs, and testing the project in a Quest VR headset.
I have gained more confidence in using Unity and ProBuilder after completing this week’s assignment.