This project focuses on expanding the capabilities of an XR application by integrating a well-designed user interface (UI). The goal is to enhance the overall user experience by implementing UI elements that provide essential information and intuitive interactive controls within the virtual environment. By designing and testing the UI, the project aims to deliver a more engaging and user-friendly interface that seamlessly complements the immersive experience.
Protoyping the UI for the VR Hub
Upon entering the VR scene, users will be greeted by a user interface (UI) panel that opens automatically, providing essential instructions and guidance. Inspired by the interface mockup created last week, this UI panel serves as a central hub for users to navigate through the XR experience seamlessly.
Upon opening, the UI panel initiates a tutorial sequence, guiding users through fundamental actions such as teleportation, movement, and object manipulation. While the tutorial plays automatically, users can access instructions manually through menu buttons for added flexibility.
Users can close the UI panel using the designated close button. Additionally, an open button will be integrated into a wooden sign at strategic locations within the scene, allowing users to reopen the UI panel to review instructions or prompts, particularly during key activities such as the bridge-building task.
As the VR experience progresses, the UI panel updates to provide relevant guidance and information tailored to each journey stage, ensuring users are guided through the immersive XR environment.
Click on the Miro board to view notes for the user Interface Panel
Learning UI Integration in Unity for VR Applications
My exploration into VR user interface integration began with understanding the role of Canvas in Unity. I learned that Canvas is a container for all UI elements, including its children. This foundational component is essential for managing how UI elements appear and interact within the VR environment.
Initial Setup of Canvas
I started by adding a Canvas to my Unity scene. Initially, Canvas was huge because its default setting was Screen Space – Overlay. This mode ensures that the Canvas overlays the entire screen, remaining static despite the viewer’s movements in the VR space.
Understanding Canvas Render Modes
Through the tutorial, I discovered that the Canvas has three render modes:
Screen Space – Overlay: This mode overlays the UI across the entire screen, unaffected by camera movements.
Screen Space – Camera: Similar to Overlay, it attaches the Canvas to a specific camera, offering slight depth and perspective adjustments.
World Space: This mode transforms the Canvas into a 3D object within the scene, allowing it to interact with other 3D elements and behave as part of the virtual world.
I switched the Canvas to World Space for my VR project and linked it to the main camera configured under XR origin. This adjustment made the canvas behave like any other object in 3D space, which is suitable for VR.
Adjusting Canvas Properties
Once the Canvas was set to World Space, I resized it to 2 by 1 meter. I repositioned it to be at the origin of my scene.
Adding and Customising UI Elements
My next step was adding a UI Panel as a child of the Canvas. I removed the panel’s background and adjusted its opacity, allowing the VR scene to remain visible through the UI, which helps maintain immersion. I also learned to add TextMesh Pro from the UI panel to manage text, adjusting its size, font and settings for clear readability.
Adding Buttons to the UI
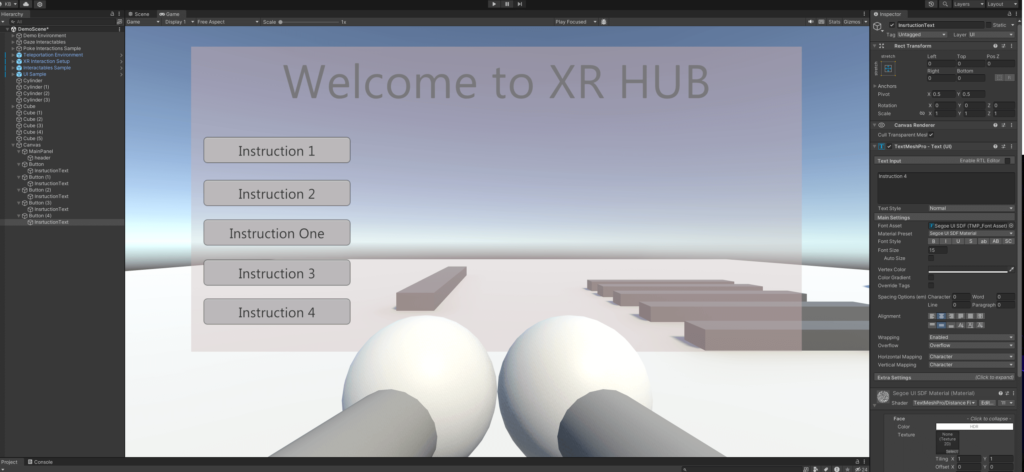
In Unity, I added a button under the Canvas by right-clicking the Canvas in the Hierarchy, selecting UI, and then Button. This automatically creates a button with a default text child object. I then duplicated the button to create more [a menu].
Adding Tutorial Panels and Scripting Button Interactions
Setting Up Instructional Panels
I then added new panels within the main UI panel designated to hold the tutorial information. Each panel was inserted to contain distinct instructional content, providing clear and concise guidance for users to get used to navigating within a VR environment [content to be added later once I get it to work!].
Scripting for Interactive Buttons
With the panels set up, I needed a way for users to navigate through the tutorial information easily. To achieve this, I utilised a script to make each panel accessible via button clicks. This script was instrumental in transforming the static panels into an interactive tutorial experience.
- Script Creation:
- Using AI assistance [as I have no idea how to write scripts!], I created a script that enabled each button to display the corresponding tutorial panel when clicked. This functionality was key to allowing users to interact with the content actively.
- Enhancing User Engagement:
- I plan to introduce a slideshow feature for when the interface is first displayed, providing an automatic walkthrough of the tutorial content. This approach aims to give users an initial overview before exploring the instructions in-depth at their own pace by clicking the buttons.
Testing and Success
Upon implementing the script and setting up the buttons, I tested the functionality in the VR environment. The buttons successfully triggered the display of each tutorial panel… whoo hoo! 🥳
I also experimented with the button settings [changing the hover colour].
Opening and Closing the UI Panel
Open and close buttons were added to the VR scene, allowing users to interact with the UI panel during their journey. Two additional buttons were created: a close button placed directly on the main canvas panel and an open button on a cube object resembling a wooden post within the scene.
The close button’s functionality was configured to deactivate the canvas holding the UI panel upon interaction. This was achieved using the gameObject.SetActive function, a method in Unity that enables or disables GameObjects in the scene dynamically. By setting the function to gameObject.SetActive(false), the UI panel is hidden from view when clicking the close button.
Similarly, the open button was configured with the same functionality but with the gameObject.SetActive function set to true. When clicked, this button activates the canvas containing the UI panel, making it visible to the user. By toggling the tickbox associated with this function, the open button seamlessly reveals the UI panel when needed, enhancing the overall user experience within the VR environment.
Next Steps
Adding Placeholders: The next phase involves refining the UI panels by adding placeholders for images and text. These placeholders will serve as visual cues for where instructional images and accompanying text will be placed, ensuring a cohesive and informative user experience throughout the VR journey.
Research on UI Assets: Further research will be conducted to explore additional UI assets that seamlessly integrate with the XR hub environment. This includes identifying and evaluating various UI elements, such as menus, buttons, and information panels, that complement the overall aesthetic and enhance user engagement within the VR environment.
Creating/Designing Assets in Figma: Leveraging Figma, a collaborative interface design tool, assets will be created and designed to be imported into the Unity project. This process involves designing visually appealing UI components that align with the XR hub’s theme and purpose, ensuring consistency and coherence across all elements of the VR experience.